Updating EtherLINQ Firmware
There are 3 methods for updating firmware on the EtherLINQ:
1. The Check For Updates button
2. Manual update
3. Via USB memory stick
Unless stated otherwise in the firmware release notes, upgrading
the EtherLINQ’s firmware will NOT erase any saved
configuration settings, but a backup of the EtherLINQ’s
configuration before updating the firmware is highly recommended. Each EtherLINQ firmware release is independent; the latest
version can be installed without installing any intervening releases.
NOTE : While the EtherLINQ is installing new firmware, the top row of LEDs
will rapidly flash in sequence and the OS LED will turn off. The firmware
update process typically takes 6-7 minutes and the EtherLINQ
will reboot at the end of the process.
DO NOT POWER OFF THE ETHERLINQ DURING A FIRMWARE UPDATE
Powering
off the prematurely may permanently damage the EtherLINQ.
Wait for the OS LED to remain on solid before attempting to connect to the EtherLINQ or powering the device off.
1. Check For Updates Button
On
the Status tab, the button next to the current firmware release causes the EtherLINQ to contact a Proxicast
server and report if newer firmware is available. For this firmware update
option, the EtherLINQ must have an active Internet
connection and a FAT32 formatted microSD memory card installed.
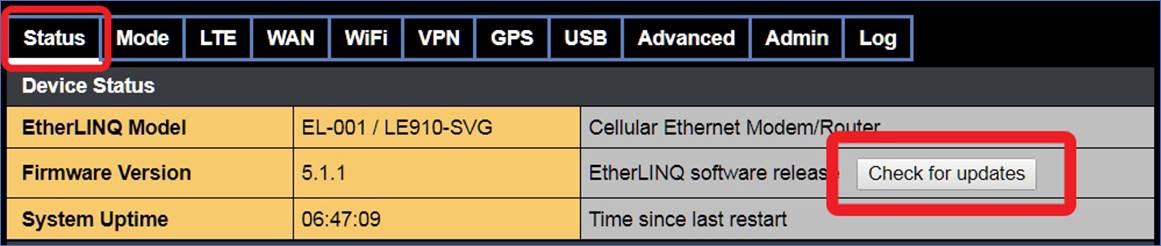
Figure 1:
Check for Firmware Updates
The
EtherLINQ will display a results page indicating if
newer firmware is available.
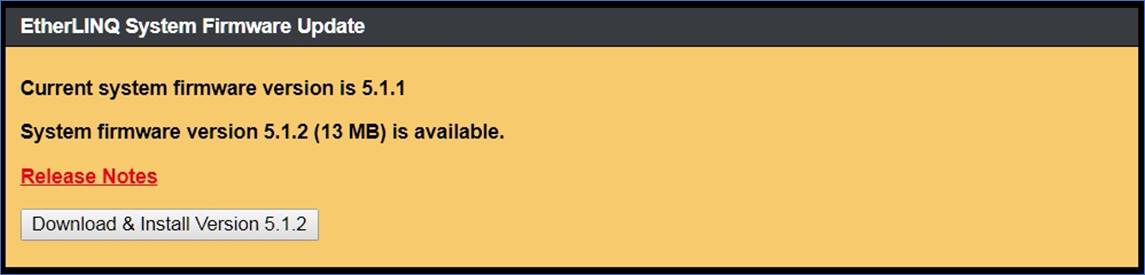
Figure
2:
Check Updates Status
Please
review the Release Notes link to see
what changes have been incorporated into the latest EtherLINQ
firmware. Click the Download & Install button to begin the firmware update
process. Depending on the speed of the EtherLINQ’s
WAN connection, it may take several minutes for the firmware to download.
When
downloading is complete, the EtherLINQ will display a
confirmation page. The new firmware will be installed on the next reboot of the
EtherLINQ.

Figure 3:
Check Updates Confirmation
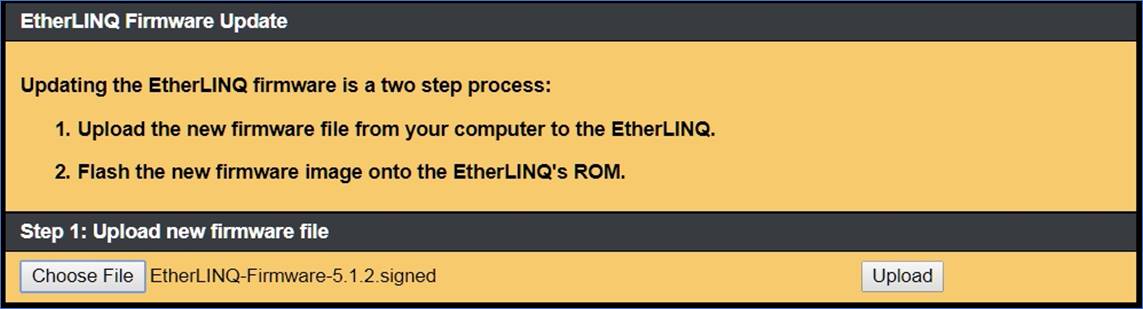
2. Manual Firmware
Update
The
EtherLINQ’s firmware can also be updated manually by
using the firmware Update button on
the Admin tab. For this option, you
must first manually download the EtherLINQ firmware
from the Proxicast web site. Check http://support.proxicast.com for information on the latest EtherLINQ firmware. Both firmware updates and downgrades
may be performed using this process.

Figure
4:
Manual Firmware Update
The
Update button presents a dialog page
to specify the location of the firmware image file that you downloaded from the
Proxicast web site (click the Choose File button). EtherLINQ firmware
image files are digitally signed to ensure that the firmware being installed is
genuine Proxicast firmware. EtherLINQ
firmware files have a file extension of “.signed”.
Figure
5:
Firmware File Selection
Click
the Upload button to transfer the
firmware file into the EtherLINQ’s temporary storage.
A confirmation page will display; Click the Begin Flashing button to start the actual firmware update process.
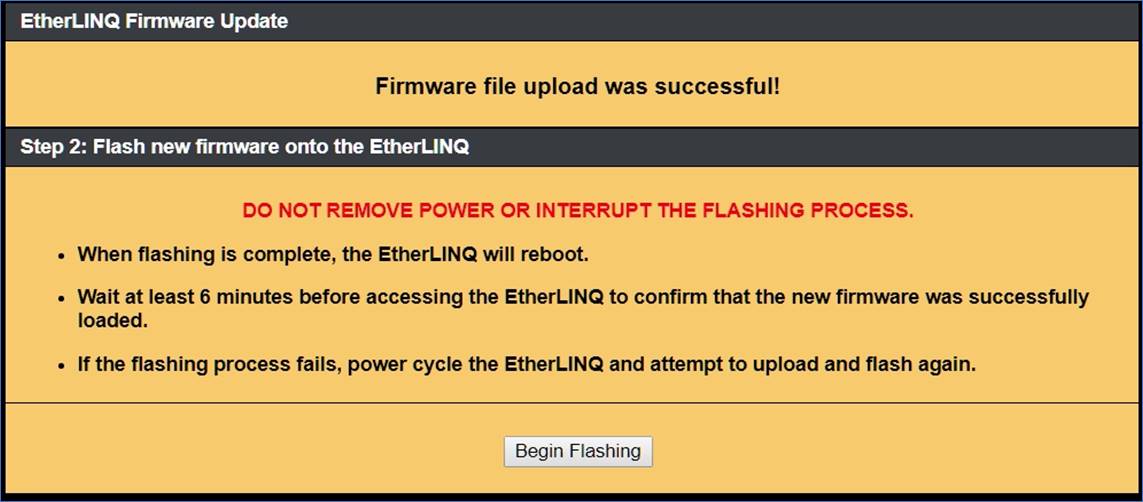
Figure 6:
Firmware Flashing
3. Firmware
Update via USB
EtherLINQ firmware can also be installed without
access to the user interface via a USB memory stick (thumb drive). This allows
field personal to perform updates while maintaining security; it is also a
convenient way to update many EtherLINQs quickly. For
this procedure a FAT32 formatted USB drive is required.
1. Download the desired EtherLINQ firmware image file from http://support.proxicast.com
2. Copy the file to the root
directory of the USB drive. Only have one version of firmware at the root.
3. Power off the EtherLINQ
and insert the USB drive into the EtherLINQ’s USB
port
4. Power on the EtherLINQ
After several seconds, the EtherLINQ
will detect the firmware file on the USB drive and begin the firmware update
process. The top row of LEDs will flash rapidly in sequence. Wait for the EtherLINQ to reboot again and the OS LED to remain on
solid. Then remove the USB drive.
NOTE : This process can only be used to install a higher numbered EtherLINQ firmware version; downgrading requires access to the EtherLINQ’s user interface. The EtherLINQ will not attempt to reinstall the same firmware version should the USB drive be left in place.